In travel, I like to visit museums to learn about the cultural, historical and social custom of the country. If permitted, visitors may use camera to capture the displayed items. In general, it is not allowed to use camera flash in order to prevent color changes affecting the exhibit or photos. However, it is not easy to take a straight and balanced displayed photo.
 My photo album Tsuen Wan Sam Tung Uk has some archive photos which were captured using camera with permission. When shooting displayed items especially archive photos, I love to use Ricoh Digital GR3 compact camera. It is because it has "Skew Correct Mode" that is rarely available in other cameras.
When we stand in front of a displayed photograph or painting, it is often that the photo taken is tilting upward, downward or skew to left or right. It will be time-consuming to correct angle adjustment to make the photo look straight. It will be inconvenient to do so if there are too many visitors around who will be blocking your view to take a straight and balanced photo.
 |
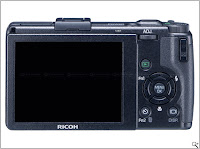
| Using GR3 to point and shoot |
While I was visiting Sam Tung Uk Museum, there was a photography zealot who took archive photos with a SLR camera. He always spent 20 to 30 seconds to adjust the viewing angle for every photo taken. People behind him looked annoyed and impatient. At that time, I was standing beside him. I just used my GR3 and pointed it to the archive photo. The shutter was fired off and It was done in less than 2 seconds! The camera would do the skew correction automatically. It is so fast and convenient.
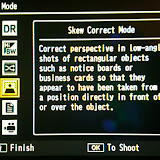
Operation procedures:
 Turn the mode dial on the top of the camera to SCENE
 Press MENU / OK
 Select Skew Correction Mode. The camera is ready for taking photo. Point at the targeted photo and shoot with automatic focus and exposure.
Press the shutter. The camera LCD viewer will show the targeted photo outlined with a yellow line.

If the camera does not have skew correction function, you may edit the skew photo with Photoshop. The GR3's skew correction mode can be used to copy business card, newspaper, magazine and other documents. This camera will become your portable scanner!
 |
| A Hakka village in Tsuen Wan, Hong Kong in 1923 (Skew correction done by GR3) |
===================================================
拍攝展覽照片旅遊時我喜歡參觀當地的文化博物館,可以增進認識當地的文化、歷史和風俗人情。倘許可的話,參觀者可以用照相機拍攝展覽品,但一般都不容許用閃光燈,以免破壞展品照片的色澤。
《 荃灣三棟屋》專輯有部份是展覽的檔案照片,是容許用相機拍下來的。拍攝展品,尤其是檔案照片,我特別喜歡使用麗確數碼GR3小型相機。因為它有一項相片「斜度修正」功能,是其他相機少有的。
當我們站在一幅展覽的照片或圖畫前拍照,由於角度問題,拍出的照片是向上、向下或左右傾斜。如果要慢慢調整角度,垂直不偏,可能要花些時間。倘若參觀者眾多,便會拍攝不便,也因其他人擋著而難以取得平衡垂直的照片了。
 |
| 用GR3隨意對著照片拍攝 |
操作步驟:

將相機頂的模式轉盤轉到 SCENE
按下 MENU/OK 鍵
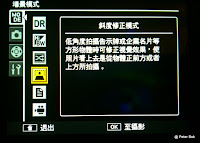
再選擇「斜度修正模式」便可以開始拍攝。


對着拍攝主題,用自動對焦和自動測光拍攝。
按下快門後,預覽螢幕上會沿着照片邊緣顯示黃色線框。
按下 MENU/OK ,相機會自動將斜度轉正並去背,十分快捷和方便。
將相機頂的模式轉盤轉到 SCENE
按下 MENU/OK 鍵

再選擇「斜度修正模式」便可以開始拍攝。

對着拍攝主題,用自動對焦和自動測光拍攝。
按下快門後,預覽螢幕上會沿着照片邊緣顯示黃色線框。
按下 MENU/OK ,相機會自動將斜度轉正並去背,十分快捷和方便。
倘若相機沒有斜度修正功能,便要利用 Photoshop 進行後期修正了。此相機斜度修正功能,更可翻拍名片、報紙、雜誌及其他文件,相機猶如變成隨身複印機了!
 |
| 1960年代荃灣舊海壩村 (相機已作斜度修正) |
这功能好用啊!特方便!1492V.D&X.THS!
ReplyDelete工欲善其事.必先利其器.攝影記錄也相同!
ReplyDeleteThe camera is fantastic!
ReplyDelete